

AI clients such as Claude and Cursor are fantastic at writing code and analyzing text, but out of the box, they’re essentially flying blind. They can’t see your data or use your tools without help. The Model Context Protocol (MCP) is the bridge. An MCP server gives an AI client new abilities, such as a call to an API or a read of a file.
In this guide, you build an MCP server from scratch in Python. You use FastMCP, the most common Python framework for the job. Learn to connect the server to Claude and Cursor. Then you deploy the server to a live host, so an AI client can reach it from anywhere.
The full code is short. You can finish the local build in about 20 minutes.
What Is an MCP Server?
The Model Context Protocol is an open standard. Anthropic released it in late 2024. It defines one common way for AI clients to talk to external systems.
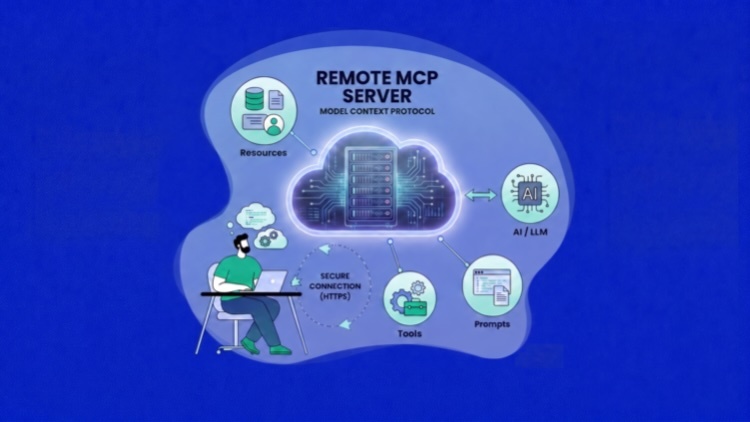
An MCP server is a small program. It sits between an AI client and a system that you own. The AI client sends a request. The server does the work and returns a result.
An MCP server gives the AI client three things:
- Tools. Actions that the client can run. For example, a check of a website status.
- Resources. Data that the client can read. For example, a list of files.
- Prompts. Ready-made instructions that the client can reuse.
The value is standardization. You write the server one time. Then any AI client that supports MCP can use it. You do not write a custom integration for each client.
What We’re Building Today
To see how this all fits together, we’re going to build a “Site Health Checker” server. It’s compact enough to build in a single sitting, but it touches all three pillars of the MCP spec.
The server gives the AI client:
- A check_site tool. It returns the HTTP status code and the response time for a URL.
- A check_ssl tool. It returns the number of days until the SSL certificate of a URL expires.
- A monitored_sites resource. It lists the sites that you watch.
- A health_report prompt. It asks the client for a short health summary.
At the end, you ask Claude a plain-English question. Claude calls your tool and gives an answer.

Prerequisites
You need these items before you start:
- Python 3.10 or a later version.
- The pip package manager, or uv. This guide uses uv.
- An AI client that supports MCP. This guide uses Claude Desktop and Cursor.
- Basic knowledge of Python.
To confirm your Python version, run this command:
bash
python3 --versionHow an MCP Server Operates
Before you write code, learn the parts. MCP has three parts:
- The host and client. This is the AI application, such as Claude Desktop. It starts and controls the connection.
- The server. This is your program. It provides the tools, resources, and prompts.
- The messages. The client and server send messages in the JSON-RPC format.
The client and server do a handshake first. The client asks the server what it can do. The server sends back its list of tools, resources, and prompts. Then the client can call them.
The transport is the channel for the messages. There are two common transports:
- stdio. The client starts the server as a local process. The two programs talk through standard input and output. Use stdio for local development.
- HTTP. The server runs as a web service. The client connects over a network. Use HTTP for a remote or shared server.
You start with stdio. Later, you change to HTTP for the remote deployment.
Build the Server With FastMCP
FastMCP does the hard work for you. It handles the protocol, the handshake, and the message format. You write plain Python functions. FastMCP turns them into tools, resources, and prompts.
Step 1. Make the Project
Create a folder for the project. Then move into it.
bash
mkdir site-health-mcp
cd
site-health-mcp
Step 2. Install the Packages
Install FastMCP and the HTTP library.
bash
uv init
uv add fastmcp httpx
Step 3. Create the Server File
Make a file with the name server.py. Add the import lines and the server object.
python
from fastmcp import FastMCP
import httpx
import ssl
import socket
from datetime import datetime, timezone
from urllib.parse import urlparse
mcp = FastMCP("Site Health Checker")
The FastMCP(“Site Health Checker”) line creates the server. The text is the name of the server. The AI client shows this name to the user.
Step 4. Add the First Tool
A tool is a Python function with the @mcp.tool decorator. Add the check_site tool below the server object.
python
@mcp.tool
def check_site(url:str) ->dict:
    """Get the HTTP status code and the response time for a URL."""
    start = datetime.now(timezone.utc)
    response = httpx.get(url, timeout=10.0, follow_redirects=True)
    elapsed = (datetime.now(timezone.utc) - start).total_seconds()
    return{
        "url": url,
        "status_code": response.status_code,
        "ok": response.is_success,
        "response_time_seconds":round(elapsed,3),
    }
Three parts of this function are important:
- The @mcp.tool decorator registers the function as a tool.
- The docstring tells the AI client what the tool does. Write it with care. The client reads it to decide when to use the tool.
- The type hints (url: str and -> dict) tell the client the input and the output. FastMCP builds the tool schema from them.
Step 5. Add the Second Tool
Add a second tool that checks the SSL certificate.
python
@mcp.tool
def check_ssl(url:str) -> dict:

"""Get the number of days until the SSL certificate of a URL expires."""

hostname = urlparse(url).hostname
context = ssl.create_default_context()
with socket.create_connection((hostname,443), timeout=10.0)as
sock:
with context.wrap_socket(sock, server_hostname=hostname)as
secure_sock:
            certificate = secure_sock.getpeercert()
    expiry = datetime.strptime(certificate["notAfter"],"%b %d %H:%M:%S %Y %Z")
    days_left = (expiry - datetime.utcnow()).days
    return{
        "url": url,
        "ssl_expiry": certificate["notAfter"],
        "days_left": days_left,
    }
This tool opens a secure connection to the site. It reads the certificate. Then it returns the number of days until the certificate expires.
Step 6. Add a Resource
A resource is read-only data. The AI client reads it, but it does not run an action. Add a resource that lists the monitored sites.
python
MONITORED_SITES = [

"https://www.cloudways.com",
"https://www.digitalocean.com",
]
@mcp.resource("sites://monitored")
def monitored_sites() ->list[str]:
    """The list of sites that you monitor."""
    return MONITORED_SITES
The @mcp.resource decorator needs a URI. The URI is the address of the resource. Here it is sites://monitored. The client uses the URI to request the data.
Step 7. Add a Prompt
A prompt is a reusable instruction. It saves the user from typing the same request each time. Add a prompt that asks for a health report.
python
@mcp.prompt
def health_report(url:str) ->str:
    """Make a prompt that asks the AI client for a health report of a site."""
    return(
        f"Check the HTTP status and the SSL expiry for {url}. "
        "Then give a short health summary."
    )
Step 8. Add the Run Command
Add the final lines to the file. These lines start the server.
python
if __name__ =="__main__":
    mcp.run()
The mcp.run() call starts the server with the stdio transport. This is the correct transport for local use.
Step 9. Run the Server
Start the server from the terminal.
bash
uv run server.pyThe server now waits for a client. It does not print much, because it talks through stdio. This is normal. Stop the server with Ctrl + C.
Your server is complete. The next step is to connect an AI client.
Connect the Server to an AI Client
Now you connect the server to Claude Desktop and Cursor. The AI client starts the server for you. You do not run the server by hand.
Connect to Claude Desktop
FastMCP can write the Claude Desktop configuration for you. Run this command:
bash
fastmcp install claude-desktop server.pyThe command adds your server to the Claude Desktop configuration file. If you prefer to edit the file by hand, open it at one of these locations:
- macOS: ~/Library/Application Support/Claude/claude_desktop_config.json
- Windows: %APPDATA%\Claude\claude_desktop_config.json
Add your server to the file. Use the absolute path to your project.
json
{
  "mcpServers": {
    "site-health": {
      "command":"uv",
      "args": ["run","--directory",
"/absolute/path/to/site-health-mcp","server.py"]
    }
  }
}
Save the file. Then close and open Claude Desktop again. Claude Desktop reads the file only at start.
Now test the server. Type this request in Claude Desktop:
text
Check the health of https://www.cloudways.comClaude calls your check_site tool. It asks for your approval first. Approve the call. Claude returns the status code and the response time.
Connect to Cursor
Cursor also supports MCP servers. Open the Cursor settings and find the MCP section. Or edit the configuration file directly at ~/.cursor/mcp.json.
Add the same server details:
json
{
  "mcpServers": {
    "site-health": {
      "command":"uv",
      "args": ["run","--directory",
"/absolute/path/to/site-health-mcp","server.py"]
    }
  }
}
Save the file. Cursor loads the server. Now you can ask Cursor the same health questions.
Deploy the MCP Server to a Remote Host
A stdio server runs on your own machine. Only your own AI client can use it. To share the server, you deploy it to a remote host. Then any client can reach it over the network.
CAUTION: A remote MCP server is open to the network. Do not deploy a server without authentication for public access. A tool can run real actions. Protect the server before you make it public. Read more in Is It Safe to Let AI Run Your Servers?.
Step 1. Change the Transport to HTTP
Change the last lines of server.py. Use the HTTP transport instead of stdio.
python
if __name__ =="__main__":
    mcp.run(transport="http", host="0.0.0.0", port=8000)
The host=”0.0.0.0″ value lets the server accept connections from the network. The port=8000 value sets the port. The server now serves an HTTP endpoint. FastMCP prints the full URL when it starts.
Step 2. Copy the Files to the Host
Connect to your remote host with SSH. This guide uses a DigitalOcean Droplet, because it gives you full root access. You find the IP address in the Droplet control panel.
bash
ssh your-user@your-server-ipCopy your project files to the host. Then move into the project folder.
Step 3. Install the Packages on the Host
Install uv on the host if it is not present. Then install the project packages.
bash
uv add fastmcp httpxStep 4. Keep the Server Alive
A normal command stops when you close the SSH session. A production server must run all the time. Use systemd to keep it alive. systemd starts the server, restarts it after a failure, and starts it again after a reboot.
First, find the full path to uv:
bash
which uv Next, create a service file at /etc/systemd/system/site-health.service. Use your own user name, project path, and uv path.
ini
[Unit]
Description=Site Health MCP Server
After=network.target
[Service]
User=your-user
WorkingDirectory=/home/your-user/site-health-mcp
ExecStart=/home/your-user/.local/bin/uv run server.py
Restart=always
[Install]
WantedBy=multi-user.target
Then start the service and enable it at boot:
bash
sudo systemctl daemon-reload
sudo systemctl enable site-health
sudo systemctl start site-health
Check that the service runs:
bash
sudo systemctl status site-health
Step 5. Expose the Server Safely
The server runs on a port on the host. For public use, put the server behind a reverse proxy. The reverse proxy adds an HTTPS certificate and a clean domain name. Point the domain at the server port.
The final endpoint looks like this:
text
https://your-domain.com/mcpStep 6. Connect a Client to the Live URL
Now connect Cursor to the live server. Use the url field instead of a local command.
json
{
  "mcpServers": {
    "site-health": {
      "url":"https://your-domain.com/mcp"
    }
  }
}
Save the file. Cursor connects to your live server. The tools work the same as before, but the server now runs in the cloud.
Test and Debug the Server
FastMCP includes a test tool called the MCP Inspector. It gives you a web page to test your server without an AI client. Run this command:
bash
fastmcp dev server.pyThe command opens the MCP Inspector in your browser. In the Inspector, you can:
- See the list of tools, resources, and prompts.
- Run a tool with test input.
- Read the output.
Use the Inspector to find problems early. It is faster than a test through a full AI client.
Next Steps
You built a working MCP server, connected it to two AI clients, and deployed it to a live host. To go further, try these tasks:
- Add authentication. Protect the remote server with a token before public use.
- Add more tools. Give the server new abilities, such as a DNS check or a disk usage report.
- Add error handling. Return a clear message when a site is down or a URL is wrong.
You can also skip the build and use a managed MCP server. For hosting management, the Cloudways MCP Server connects your AI client to your Cloudways account. You manage servers and applications in plain English, without a custom build. It is a good option when you want the result, but not the maintenance. To see it in action, read the Agency Management MCP Blueprint.
What is an MCP server in Python? An MCP server in Python is a program that connects an AI client to your data and tools. It uses the Model Context Protocol. You write it with a Python framework such as FastMCP.
Is FastMCP the same as the MCP Python SDK? FastMCP is a Python framework for MCP servers. It builds on the official protocol and adds simple decorators. It is the fastest way to build a server in Python.
How do I connect a Python MCP server to Claude or Cursor? You add the server to the client configuration file. For a local server, you give the run command. For a remote server, you give the server URL. Then you restart the client.
How do I host a Python MCP server? Change the transport to HTTP. Copy the files to a remote host, such as a DigitalOcean Droplet. Keep the server alive with a process manager such as systemd. Then put it behind a reverse proxy with HTTPS.
Should I use the stdio transport or the HTTP transport? Use stdio for local development on your own machine. Use HTTP when you want a remote or shared server that many clients can reach.
Start Growing with Cloudways Today.
Our Clients Love us because we never compromise on these
Zain Imran
Zain is an electronics engineer and an MBA who loves to delve deep into technologies to communicate the value they create for businesses. Interested in system architectures, optimizations, and technical documentation, he strives to offer unique insights to readers. Zain is a sports fan and loves indulging in app development as a hobby.