Key Takeaways
- Self-hosting n8n as a Node.js app avoids execution-based pricing, since your only cost is the server itself, not how many times a workflow runs.
- Cloudways Velocity deploys n8n directly from a Git repository, so there’s no Docker, Nginx, or SSL setup required.
- A small server.js entry file and a few environment variables (N8N_PORT, N8N_PROTOCOL, N8N_PROXY_HOPS) are all that’s needed to run n8n behind Velocity’s reverse proxy.
- Updating n8n later is as simple as editing package.json and pushing to the main branch — Velocity rebuilds the app automatically.
Workflow automation tools are everywhere now. Connecting APIs and automating repetitive tasks is easier than it used to be. The problem starts when those workflows get bigger and run more often. At that point, standard cloud plans can get expensive, especially when you’re paying based on usage.
For heavy users, execution-based pricing can add up quickly. A workflow with multiple steps that runs repeatedly can burn through a monthly execution limit pretty fast.
That’s where n8n comes in. It’s an automation platform that you can self-host, giving you more control over how it runs and where your workflow data is stored.
My goal here is pretty straightforward: run complex automations without having to worry about how many times they execute. To do that, I’m going to self-host n8n using a custom Node.js repository and deploy it on a persistent Cloudways Velocity environment. There’s no Docker setup or manual Linux VPS configuration involved.
What Does n8n Self-Hosted Mean?
Self-hosting n8n means running n8n on infrastructure that you manage instead of using n8n’s managed cloud service. You install and run the open-source version yourself, which gives you control over the application, its data, and how the server is configured.
There are several ways to run a self-hosted n8n instance. Docker is a common option, but it isn’t the only one. n8n runs on Node.js, so you can also run it directly as a Node.js process without setting up containers or a Kubernetes cluster.
The n8n Self-Hosted Architecture
There are a few ways to structure an n8n setup, depending on how much traffic your workflows handle.
For a basic test, you can run n8n with its default SQLite database. That works fine for getting started, but SQLite isn’t the best choice once the workload increases. For a production setup, I’d use a PostgreSQL database alongside the main n8n Node.js process.
In this setup, both n8n and PostgreSQL run on the same server. This keeps the database connection local while giving n8n a more suitable database for a larger workload. You don’t need to add worker nodes or Redis just to get a basic self-hosted setup running.
Why You Should Self-Host n8n
If you’re running automations regularly, usage-based cloud pricing can become a problem. A workflow that makes several API calls every time it runs can quickly add up when you’re running it hundreds or thousands of times.
With a self-hosted n8n setup, your main hosting cost is the server itself. Whether a workflow runs ten times a day or much more frequently, you’re not paying n8n separately for each execution.
You also have more control over your data. Database credentials, API keys, webhook data, and workflow information stay on infrastructure that you manage instead of being stored in someone else’s managed environment.
Ditching Docker for Managed Node.js
Once you’ve decided to self-host n8n, you still need to decide how you’re going to run it.
The usual approach is to rent a Linux VPS and set up n8n with Docker. That works, but it also means taking care of things like the Docker environment, Nginx, SSL certificates, system updates, and process management yourself.
That’s where running n8n as a Node.js application on Velocity comes in.
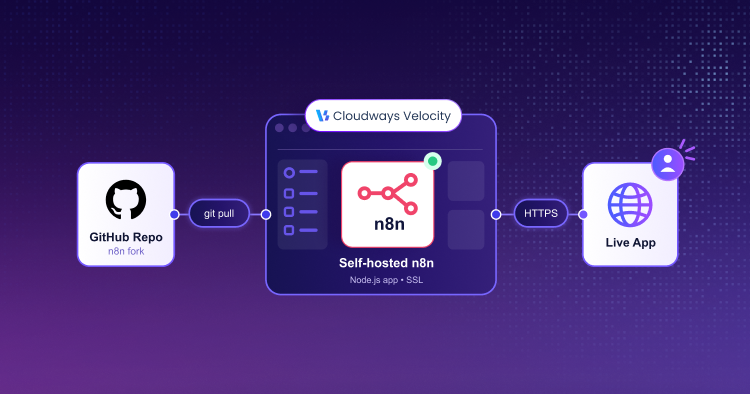
n8n is a Node.js application, so you can deploy it from a GitHub repository and specify the version you want in your package.json. Velocity takes care of the application process and reverse proxy, so there’s no need to build the whole server environment yourself or manage it through an SSH terminal.
Skip Docker, Deploy Straight from Git
Cloudways Velocity handles the application process, reverse proxy, and SSL for you, so you can ship your n8n instance without managing servers.
Mini Project: Deploying n8n to Cloudways Velocity
I’m going to set up a working n8n instance to show what the whole process looks like from start to finish. I’ll use the default Velocity URL, so I don’t need to buy or configure a domain first.
Testing it Locally First
Before pushing the project to Cloudways Velocity, I wanted to test everything locally first and make sure the setup worked. It’s much easier to deal with errors on my own machine than to push the project and then try to figure out why I’m getting a 502 Bad Gateway in the cloud.
Here’s what I did.
I downloaded the project files from the Cloudways n8n Git repository and extracted them into my Downloads folder:
C:\Users\abdulrehman\Downloads\n8n-main\n8n-main

I then opened Command Prompt (cmd). Since I was using a standalone version of Node.js, I needed to add its folder to the PATH so the terminal could find Node and npm. I ran:
set PATH=%PATH%;C:\Users\abdulrehman\Downloads\node-v24.18.0-win-x64\node-v24.18.0-win-x64
Then I moved into the project folder:
cd C:\Users\abdulrehman\Downloads\n8n-main\n8n-main
From there, I installed the project dependencies:
npm install
Once that finished, I started n8n:
n8n
When the terminal showed that n8n was running, I pressed the o key. This opened the browser automatically and took me to the setup page at:
http://localhost:5678/setup
Everything worked locally, so I was ready to move on to the Cloudways Velocity deployment.
Step 1: Fork the n8n Repository
Velocity deploys directly from Git, so the code needs to be in a repository. We have an n8n repository set up for Velocity that includes a package.json with the n8n version and start command, along with a package-lock.json to keep the dependencies consistent.
I fork the repository to my GitHub account and give the fork whatever name I want. This keeps the package.json and package-lock.json on the main branch, which is all Velocity needs to install the dependencies.
Step 2: Add the Entry File
Velocity needs an entry file to start the application, so I add a small server.js file to the root of the fork:
process.env.N8N_PORT = process.env.N8N_PORT || '3000';
require('n8n/bin/n8n');
This starts n8n on port 3000. I commit the file to main.
Step 3: Create the Velocity Application
In the dashboard, I open Velocity and click Get Started to create a new application.
For the plan, I go with Starter, which is enough for a light automation setup.
Next, I connect my GitHub account to Cloudways and select the n8n repo I forked earlier.
Once connected, there are a few settings to configure here:
- Framework: Other
- Node version: 22.x
- Environment Type: Server-Side Rendering (SSR). n8n runs as a backend process, so SSR is needed instead of CSR.
Next, I open the Build and output settings, check Set Custom Value for each field, and enter the following:
- Package Manager: npm
- Build Command: npm run build
- Entry File:
server.js
Step 4: Add Environment Variables
Before deploying, I add the environment variables n8n needs to work properly behind the Velocity proxy:
N8N_PORT=3000
N8N_PROTOCOL=https
N8N_PROXY_HOPS=1
GENERIC_TIMEZONE=YourTimeZone
TZ=YourTimeZone
N8N_PORT matches the port the app runs on. N8N_PROTOCOL and N8N_PROXY_HOPS let n8n know that it’s running over HTTPS behind Velocity’s reverse proxy, so links and sessions work as expected. GENERIC_TIMEZONE and TZ set the timezone for scheduled workflows.
Step 5: Deploy
Once everything is set, I click Deploy Now. It takes a few minutes for Velocity to pull the repository, install the dependencies, and start the app behind NGINX with SSL enabled on the default hostname.
Step 6: Sign In and Run a Workflow
I open the app URL, which loads over HTTPS and takes me to the n8n owner setup screen.
I enter my name, email, and password to create the owner account.
Once the account is created, from the sidebar, I click Overview and create a new workflow.
On the blank canvas, I add a Trigger manually node, followed by an Edit Fields node. I add a field called message and set its value to Hello from n8n on Cloudways.
I click Execute Workflow. Both nodes turn green, and the Edit Fields node shows the message in its output. I save the workflow as hello-cloudways.
At this point, the setup is done. n8n is running as a persistent Node process on Velocity, and I can run the workflow whenever I need to.
How to Update Your Self-Hosted n8n Instance on Cloudways Velocity
Updating n8n is fairly simple when the application is connected to your Git repository. You don’t need to log into the server or run commands through SSH to update it.
Open your local project folder and edit the package.json file. Change the n8n dependency to the version you want to install, then run npm install to update the package-lock.json file.
Once that’s done, commit the changes and push them to the main branch on GitHub. Velocity picks up the new commit, pulls the updated code, and rebuilds the application.
Run Your Own n8n Instance Today
Fork the repository, connect it to Velocity, and have a production-ready n8n instance running in minutes.
Wrapping Up
Running n8n yourself means you decide where it runs and where the workflow data is kept. With Cloudways Velocity handling the application environment, there’s also less server work to deal with.
For the setup I covered in this guide, I didn’t configure Docker, Nginx, SSL, or process management manually. I simply connected the Git repository, deployed the Node.js application, and let Velocity take care of the application environment.
I’ve also pushed the base n8n repository to GitHub, so you can use the same setup as a starting point. If you run into an issue while deploying it, leave a comment and I’ll take a look.
Q1: Can n8n be self-hosted?
Yes. You can run n8n on your own server instead of using n8n’s hosted service. Docker and npm are both options, and you can also run it as a Node.js application on Cloudways Velocity.
Q2: Is n8n self-hosted free?
You don’t pay n8n a separate hosting fee when you run the software yourself. However, you’ll still have the cost of the server or hosting platform where you run n8n. Your use also needs to follow n8n’s Sustainable Use License.
Q3: Do I need Docker to self-host n8n on Cloudways?
No. For this setup, n8n runs directly as a Node.js application. You don’t need to create a Docker container or manage one yourself. Velocity handles the application process and reverse proxy.
Q4: Why should I use PostgreSQL instead of SQLite for n8n?
SQLite works well when you’re testing n8n or running a small setup. Once you’re dealing with a larger number of workflows and concurrent executions, PostgreSQL is a better fit for the database.
Q5: How do I fix wrong webhook URLs in n8n?
Set N8N_WEBHOOK_URL to the URL you’re using to access your n8n application. Since the application runs behind the Velocity reverse proxy, also set N8N_PROXY_HOPS=1. This lets n8n know that there is a proxy in front of it when it handles webhook requests.
Start Growing with Cloudways Today.
Our Clients Love us because we never compromise on these
[email protected]
Abdul is a tech-savvy, coffee-fuelled, and creatively driven marketer who loves keeping up with the latest software updates and tech gadgets. He's also a skilled technical writer who can explain complex concepts simply for a broad audience. Abdul enjoys sharing his knowledge of the Cloud industry through user manuals, documentation, and blog posts.