


These days, software and platforms expose API to enable other applications interface with the core application. Developers use API to create custom interfaces and dashboards. I have previously covered WordPress REST API in my previous articles.
In this WooCommerce API tutorial, I will tell you how you can easily create a custom dashboard on any web hosting for PHP. Although this dashboard will be pretty basic, you could easily extend it to fit your requirements. I will use the WooCommerce PHP API for implementing the Dashboard.
Before going further, you need to know how RESTful APIs work, how they authenticate requests, and how responses are returned by the API.
GitHub: https://github.com/shahroznawaz/woo-dashboard
Prerequisites for the Dashboard
- Sign up for a Cloudways account
- Launch Woocommerce application
- Generate Consumer key and secret
- Install the API Package
Cloudways has taken all the pain out of launching and maintaining a successful WooCommerce store. If you need help in setting up a WooCommerce store on the Cloudways Platform, all you need to do is sign up to the Platform and launch a WooCommerce application.
Next, log in to the store’s Admin Panel, go to the WooCommerce → Settings and enable REST API. Go to the Key/Apps tab and enter the Key Description, select the permission you want (for this tutorial, I have selected Read/Write). Now click the Generate API Key button.

You will get the API Key, API Secret and QR code to scan,
I will use these keys in the future to work with the WooCommerce REST API. But before all this, I will install the PHP API package for WooCommerce.
Want to Test Your Changes on Free Staging URLs?
Try Cloudways managed WooCommerce hosting for a hassle-free experience.
Install WooCommerce PHP Package API
WooCommerce has an official API package (written in PHP) that can be used for creating custom apps. The package is well maintained and available on GitHub.
For installing the API package, I will launch a PHP stack app. Once the application is up, go to the SSH terminal using the provided Master Credentials. Move to your PHP application and run the Composer command for installing the package.
composer require automattic/woocommerce
This command will install the latest version of the package available on GitHub. You can also find the composer.json file in your folder. Next, create an index.php file. I will use Bootstrap and jQuery for the frontend. Also, I will use JavaScript. So add the following code in the HTML head tag:
<script src="https://ajax.googleapis.com/ajax/libs/jquery/3.1.0/jquery.min.js"></script>

   <link rel="stylesheet" href="https://maxcdn.bootstrapcdn.com/bootstrap/3.3.7/css/bootstrap.min.css" />

   <script src="https://maxcdn.bootstrapcdn.com/bootstrap/3.3.7/js/bootstrap.min.js"></script>
Require autoload.php and Dependency Files
After installing the package, you need to require autoload.php for initializing the library. This API library has an HTTP function for sending the requests and getting the responses. I will add the HTTP client library in the index.php:
<?php

require __DIR__ . '/vendor/autoload.php';


use Automattic\WooCommerce\Client;

use Automattic\WooCommerce\HttpClient\HttpClientException;
Now, create the object for Client, providing the Consumer key and the consumer secret in it.
$woocommerce = new Client('http://woocommerce-71265-250265.cloudwaysapps.com/',

                         'ck_96212f68c4a260f2a38f2045161f266c90f4de67',

                         'cs_26ab2d971f3f2472c1b3a796bb25e97231c58599',

                         [

                         'wp_api' => true, 'version' => 'wc/v1',

]);
At this point, you are all set to use API calls for GET, POST, DELETE, and PUT to work with the stored data. You can use `var_dump($woocommerce);` to check if the API return TRUE or FALSE.
Get All Orders at the Store
WooCommerce offers a lot of functions and I would recommend you check out the official documentation for detailed coverage of these functions. For this tutorial, I have selected a few of these functions including orders, customers, and products. The API also provides exception management.
First PHP Website Migration Is Free At Cloudways
Cloudways Engineers can migrate your website Flawlessly
Here is how the Dashboard will look like. As you could see the Dashboard will display the orders, customers, products, and total sales.
Add the following code to the index.php file.
try {


$results = $woocommerce->get('orders');

$products = $woocommerce->get('products');

$customers = $woocommerce->get('customers');


$result = count($results);

$customer = count($customers);

$product = count($products);


//you can set any date which you want

           $query = ['date_min' => '2017-10-01', 'date_max' => '2017-10-30'];

$sales = $woocommerce->get('reports/sales', $query);

$sale = $sales[0]["total_sales"];

}


catch(HttpClientException $e) {

$e->getMessage(); // Error message.

$e->getRequest(); // Last request data.

$e->getResponse(); // Last response data.

}
To show the results, I will add the following basic markup:
<div class="col-sm-9 col-sm-offset-3 col-md-10 col-md-offset-1">

                    <h1 class="page-header">Dashboard</h1>


                    <div class="row placeholders">

                               <div class="col-xs-6 col-sm-3 placeholder">

                                   <p id="large">

                                       <?php echo $result?>

                                   </p>

                                   <hr>

                                   <span class="text-muted">Total Orders</span>

                               </div>

                               <div class="col-xs-6 col-sm-3 placeholder">

                                   <p id="large">

                                       <?php echo $customer?>

                                   </p>

                                   <hr>


                                   <span class="text-muted">Customers</span>

                               </div>

                               <div class="col-xs-6 col-sm-3 placeholder">

                                   <p id="large">

                                       <?php echo $product?>

                                   </p>

                                   <hr>

                                   <span class="text-muted">All Products</span>

                               </div>

                               <div class="col-xs-6 col-sm-3 placeholder">

                                   <p id="large">

                                       <?php echo $sale?>

                                   </p>

                                   <hr>

                                   <span class="text-muted">Total Sales</span>

                               </div>

                     </div>

             </div>
This is pretty simple. I got all the values by requesting the WooCommerce API and displayed them in the highlighted fold for a quick display. For exception handling, I have used try-catch methods.
Get all Orders via API
You can get all orders through the following single line of code:
$results = $woocommerce->get('orders');
Now I will show the order summary in an organized table through the following table code:
<div class="container">

                             <h2 class="sub-header">Orders List</h2>

                               <div class='table-responsive'>

                                   <table id='myTable' class='table table-striped table-bordered'>

                                       <thead>

                                           <tr>

                                               <th>Order #</th>

                                               <th>Customer</th>

                                               <th>Address</th>

                                               <th>Contact</th>

                                               <th>Order Date</th>

                                               <th>Status</th>

                                               <th>Actions</th>

                                           </tr>

                                       </thead>

                                       <tbody>

                                           <?php

               foreach($results as $details){


               echo "<tr><td>" . $details["id"]."</td>

                         <td>" . $details["billing"]["first_name"].$details["billing"]["last_name"]."</td>

                         <td>" . $details["shipping"]["address_1"]."</td>

                         <td>" . $details["billing"]["phone"]."</td>

                         <td>" . $details["date_created"]."</td>

                         <td>" . $details["status"]."</td>

                         <td><a class='open-AddBookDialog btn btn-primary' data-target='#myModal' data-id=".$details['id']." data-toggle='modal'>Update</a>

                         <a class='open-deleteDialog btn btn-danger' data-target='#myModal1' data-id=".$details['id']." data-toggle='modal'>Delete</a></td></tr>";

               }

               ?>

                                       </tbody>

                                   </table>

                               </div>

              </div>
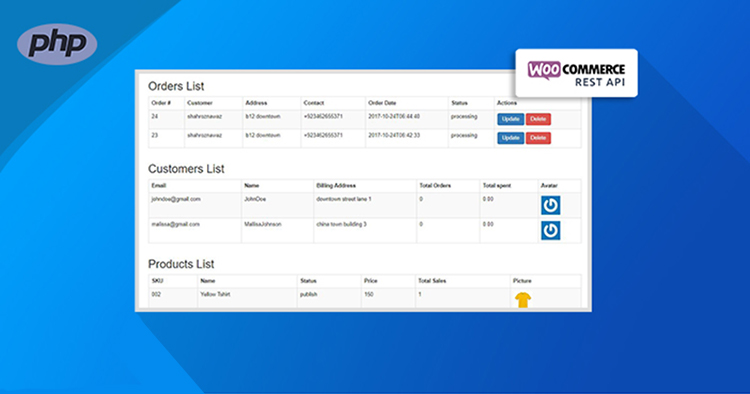
In this table, I haven’t displayed all the data. You could extend the display as per your requirements. At this time, the Order table will look like this:
Update the Order Status
For order status, I have added two options Update and Delete. Normally when an order is placed, it defaults state is processing. As the order moves to the next state, you can always update the status to reflect the changes. For this purpose, I will pass the order ID to the buttons in this format: `data-id=”.$details[‘id’]`. Now I will catch this ID in a Bootstrap modal and select the state for this order. The modal code will be:
<div class="modal fade" id="myModal" role="dialog"> <div class="modal-dialog"> <!-- Modal content--> <div class="modal-content"> <div class="modal-header"> <button type="button" class="close" data-dismiss="modal">×</button> <h4 class="modal-title">Modal Header</h4> </div> <div class="modal-body"> <p>Some text in the modal.</p> <form action="" method="post"> <div class="form-group"> <input type="text" class="form-control" name="bookId" id="bookId" value=""> <label for="sel1">Select list (select one):</label> <select class="form-control" id="status" name="ostatus"> <option>Pending Payment</option> <option>processing</option> <option>On Hold</option> <option>completed</option> <option>Cancelled</option> <option>Refunded</option> <option>Failed</option> </select> </div> <div class="modal-footer"> <button type="submit" class="btn btn-block" name="btn-update">Update</button> </div> </form> </div> </div> </div> </div>
Nothing fancy in it. I have assigned the name and ID’s to the input type and select box. Next, I will add jquery to catch the order ID in the modal.
<script>

           $(document).on("click", ".open-AddBookDialog", function() {

               var myBookId = $(this).data('id');

               $(".modal-body #bookId").val(myBookId);

           });

</script>
In the above script, I am simply assigning the data-id value to the input box using the input box ID. Next, for updating the status of the order I need to add PHP code to create a POST call.
if (isset($_POST['btn-update'])) {

$status = $_POST['bookId'];

$st = $_POST['ostatus'];


$woocommerce->put('orders/' . $status, array(

'status' => $st

));

header('Location: https://shahroznawaz.com/woo');

}
This code is pretty simple. The condition will check the submitted form and catch the values. Next, I have appended the order ID to order URL because the update URL need the order ID with the order call, something similar to this: (orders/order-ID, orders/16)
Now, when you click on the Update button, it will show the order ID and you can select the order state and update it:
Delete a Specific Order
For deleting a specific order, I will use the same logic of showing Order ID in modal, and taking the user’s confirmation for deleting the order or canceling the action. The modal code will be:
<div class="modal fade" id="myModal1" role="dialog"> <div class="modal-dialog"> <!-- Modal content--> <div class="modal-content"> <div class="modal-header"> <button type="button" class="close" data-dismiss="modal">×</button> <h4 class="modal-title">Modal Header</h4> </div> <div class="modal-body"> <p>Some text in the modal.</p> <form action="" method="post"> <div class="form-group"> <input type="text" class="form-control" name="cId" id="cId" value=""> </div> <div class="modal-footer"> <button type="button" class="btn btn-default" data-dismiss="modal">Cancel</button> <button type="submit" class="btn btn-danger" name="btn-delete">Delete</button> </div> </form> </div> </div> </div> </div>
The jquery code for it:
<script>

           $(document).on("click", ".open-deleteDialog", function() {

               var myBook = $(this).data('id');

               $(".modal-body #cId").val(myBook);

           });

 </script>
The PHP code snippet for deleting the order through the Delete button is:
if (isset($_POST['btn-delete'])) {

$oid = $_POST['cId'];

$woocommerce->delete('orders/' . $oid, ['force' => true]);

header('Location: https://shahroznawaz.com/woo');

}
Click the Delete button to delete the order or the Cancel button if you don’t want to do it.
Get All Customers
All the customers can be retrieved using the following GET call:
$customers = $woocommerce->get('customers');
Now to show the details of the customer, add one more Bootstrap container with the table:
<div class="container">

                                  <h2 class="sub-header">Customers List</h2>

                                  <div class='table-responsive'>

                                      <table id='myTable' class='table table-striped table-bordered'>

                                          <thead>

                                              <tr>

                                                  <th>Email</th>

                                                  <th>Name</th>

                                                  <th>Billing Address</th>

                                                  <th>Total Orders</th>

                                                  <th>Total spent</th>

                                                  <th>Avatar</th>

                                                  <th>Actions</th>

                                              </tr>

                                          </thead>

                                          <tbody>

                                              <?php

                  foreach($customers as $customer){


                  echo "<tr><td>" . $customer["email"]."</td>

                            <td>" . $customer["first_name"].$customer["last_name"]."</td>

                            <td>" . $customer["billing"]["address_1"]."</td>

                            <td>" . $customer["orders_count"]."</td>

                            <td>" . $customer["total_spent"]."</td>

                            <td><img height='50px' width='50px' src='".$customer["avatar_url"]."'></td>

                             <td><a class='open-AddBookDialog btn btn-primary' data-target='#myModal' data-id=".$customer['id']." data-toggle='modal'>Update</a>

                             <a class='open-deleteDialog btn btn-danger' data-target='#myModal1' data-id=".$customer['id']." data-toggle='modal'>Delete</a></td></tr>";

                  }


                  ?>

                                          </tbody>

                                      </table>

                                  </div>

  </div>
This is how the customer list will be displayed:
I will not cover the CRUD functions for customers in this tutorial.
Get All the Products of the Store
All the products on the store can be retrieved using the following GET call:
$products = $woocommerce->get('products');
Here is the table that will show the details of the products:
<div class="container">

                                  <h2 class="sub-header">Products List</h2>

                                  <div class='table-responsive'>

                                      <table id='myTable' class='table table-striped table-bordered'>

                                          <thead>

                                              <tr>

                                                  <th>SKU</th>

                                                  <th>Name</th>

                                                  <th>Status</th>

                                                  <th>Price</th>

                                                  <th>Total Sales</th>

                                                  <th>Picture</th>

                                              </tr>

                                          </thead>

                                          <tbody>

                                              <?php

                  foreach($products as $product){


                  echo "<tr><td>" . $product["sku"]."</td>

                            <td>" . $product["name"]."</td>

                            <td>" . $product["status"]."</td>

                            <td>" . $product["price"]."</td>

                            <td>" . $product["total_sales"]."</td>

                            <td><img height='50px' width='50px' src='".$product["images"][0]["src"]."'></td></tr>";

                  }


                  ?>

                                          </tbody>

                                      </table>

                                  </div>

  </div>
The product list will be displayed as follows:
At this point, the dashboard will look like:
Conclusion
Woocommerce API has lots of options that simplify working with product variation, attributes, categories, taxes, coupons, etc. In this tutorial, I have tried to create a basic dashboard that manipulates and highlight orders, customers, and products. This WooCommerce custom dashboard can help you take a quick look at how the store is performing at the moment, and quickly process the orders.
Q: What is WooCommerce Rest API?
WooCommerce REST API is a tool that allows users to read and write various default WooCommerce features like products, orders, coupons, and checkout. To enable the API key, go to WooCommerce → Settings → Advanced → REST API.
Q: How do I use WooCommerce REST API?
WooCommerce allows users to enable Rest API by generating API Key.
- Go to WordPress Dashboard → WooCommerce → Settings → Advance
- Click on API Section and generate the key.
- Define the scope of Rest API under the description field, select the users to access API functions, and assign read/write permission.
- Click on Generate API Key
Shahzeb Ahmed
Shahzeb is a Digital Marketer with a Software Engineering background, works as a Community Manager — PHP Community at Cloudways. He is growth ambitious and aims to learn & share information about PHP & Laravel Development through practice and experimentation. He loves to travel and explore new ideas whenever he finds time. Get in touch with him at [email protected]


