


There are times when the available WooCommerce custom product types are not enough for your requirements. In such cases, you have the option to opt for the default WooCommerce custom product type. However, this is not a feasible option for many situations.
A common situation where you might need to opt for custom WooCommerce product type is where the available product types are inadequate for your requirements. Similarly, the default WooCommerce product types are also unable to fit your requirements.
Another common scenario where WooCommerce custom post type adds value to the store is where you do not wish or need to change the existing theme of the store. In such cases, you need a way to add default product type without disrupting the them. In this short tutorial, I will describe how you can use WooCommerce product post type that are not dependent on current WooCommerce product type.
Not sure how to create custom product types in WooCommerce?
No worries. A Cloudways Expert can do it for you.
Register Post Type
The first step is the registration of a new WooCommerce custom product type. Note that your post type should be registered as the native WooCommerce classes. Consider the following code snippet:
function lease_cpt_register() {

	class CPT_lease_product extends WC_Product_Simple {
    	public function __construct( $product ) {
            $this->product_type = 'lease_cpt';
            parent::__construct( $product );
    	}
	}
}
add_action( 'init', 'lease_cpt_register' );
Note that CPT_lease_product is a custom class which extends the the default WooCommerce product function WC_Product_Simple.
function add_cpt_lease_product( $types ){

$types[ 'lease_cpt' ] = __( 'Least CPT' );

return $types;

}

add_filter( 'product_type_selector', 'add_cpt_lease_product' );
WooCommerce Hosting – Fast & Reliable Hosting for Online Stores
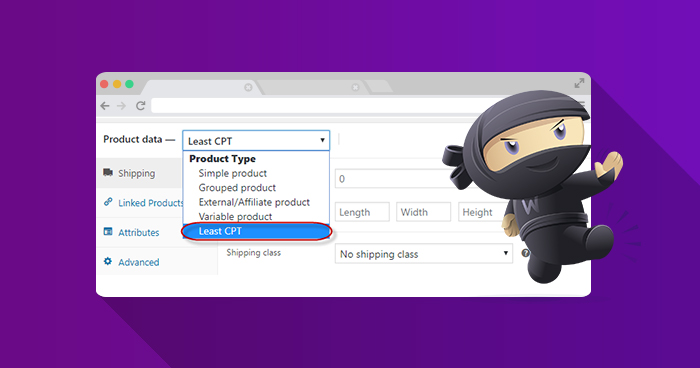
In the above code snippet, key of product_type parameter must be the same. Additionally, the add_cpt_lease_product is the function that I use to display the custom post type in the Product Data dropdown. Check out the following screenshot:

function lease_cpt_register() {

	class CPT_lease_product extends WC_Product_Simple {
    	public function __construct( $product ) {
            $this->product_type = 'lease_cpt';
            parent::__construct( $product );
    	}
	}
}
add_action( 'init', 'lease_cpt_register' );
While working with WooCommerce custom product type, you can also place the code in a separate file.
function add_cpt_lease_product( $types ){
	$types[ 'lease_cpt' ] = __( 'Least CPT' );
	return $types;
}
add_filter( 'product_type_selector', 'add_cpt_lease_product' );
Note that in the the above code snippet, the key must be same as the one used in the class product_type.
The following code snippet adds a new setting panel that shows the new Lease variable product type (our new WooCommerce custom post type):
function cpt_woo_tab( $tabs) {
	$tabs['lease'] = array(
    	'label'                        	=> __( 'Lease', 'woocommerce' ),
    	'target'      	=> 'cpt_woo_opt',
	);
	return $tabs;
}
add_filter( 'woocommerce_product_data_tabs', 'cpt_woo_tab' );
The following code is used to add content of the Lease custom post type:
function lease_cpt_woo_opt() {
	global $post;
	?><div id='cpt_woo_opt' class='panel woocommerce_options_panel'><?php
	?><div class='options_group'><?php
        woocommerce_wp_text_input( array(
        	'id'                                          	=> 'woo_cpt_input_txt',
        	'type'                                     	=> 'text',
        	'label'                                    	=> __( 'Insert your Value', 'woocommerce' ),
    	) );
    	woocommerce_wp_checkbox( array(
        	'id'                          	=> 'woo_cpt_opt',
        	'label'    	=> __( 'Allow Option', 'woocommerce' ),
    	) );
        ?></div>
</div><?php
}
add_action( 'woocommerce_product_data_panels', 'lease_cpt_woo_opt' );
The following code saves the custom field value of Lease custom post type
function save_lease_cpt_field( $post_id ) {
	$lease_opportunity = isset( $_POST['lease_woo_cpt_opt'] ) ? 'yes' : 'no';
	update_post_meta( $post_id, 'lease_woo_cpt_opt', $lease_opportunity );
	if ( isset( $_POST['woo_cpt_input_txt'] ) ) :
        update_post_meta( $post_id, 'woo_cpt_input_txt', sanitize_text_field( $_POST['woo_cpt_input_txt'] ) );
	endif;
}
add_action( 'woocommerce_process_product_meta_simple_rental', 'save_lease_cpt_field'  );
add_action( 'woocommerce_process_product_meta_variable_rental', 'save_lease_cpt_field'  );
Conclusion
In this simple tutorial, I demonstrated how you can easily create WooCommerce custom product type. I also highlighted the need for such product types and why these are a great idea for many stores that can leverage WooCommerce extra product options for their benefit.
Q. How do I create a custom product type in WooCommerce?
You can create a custom product type in WooCommerce by using hooks and filters in your theme’s functions.php file or by developing a custom plugin.
Q. How do I change the product type in WooCommerce?
Follow the steps below to change the product type in WooCommerce:
- Navigate to the WordPress admin dashboard.
- Go to the Products section and select the product you want to modify.
- Edit the product details and locate the Product Type option.
- Choose the desired product type from the dropdown menu.
- Save the changes to update the product with the new type.
Q. How do I customize a product category in WooCommerce?
Here’s how you can customize a product category in WooCommerce:
- Access the WordPress admin dashboard.
- Navigate to the Products > Categories section.
- Select the category you want to customize.
- Modify the category description, image, or slug as necessary.
Optionally, you can use hooks and filters in your theme or custom code to further customize the category display or functionality.
Q. How do I change the product style in WooCommerce?
You can change the product style in WooCommerce by overriding default styles with custom CSS or by using plugins or themes that offer style customization options.
Owais Khan
Owais works as a Marketing Manager at Cloudways (managed hosting platform) where he focuses on growth, demand generation, and strategic partnerships. With more than a decade of experience in digital marketing and B2B, Owais prefers to build systems that help teams achieve their full potential.

