


The idea behind a membership site is simple: certain posts, pages, or actions are available only to privileged users (members). From the perspective of a web developer, membership sites are the most challenging with respect to developing WordPress Membership Site.
This article covers the challenges you face when building a customized membership site in WordPress, especially if you are not a programmer. It also explains how to approach some of those challenges using Toolset plugins.
What Is a Membership Site?
Any website that provides user accounts with access to assets (that regular visitors cannot see) can be considered a membership site.
Reasons behind launching membership sites may vary:
- A small business must include on their company’s website some information intended for staff only (which should be completely hidden from visitors).
- To build a mailing list, bloggers may want to offer some additional content for registered users.
Membership sites may also have different groups of members. For example, job seekers (group 1) may sign up to post their CVs for free, but headhunters (group 2) would need to pay so that they can access and launch an advanced search to find candidates of their choice quickly.
Is WordPress a Good Platform for Developing a Membership Site?
To answer this question, we first must establish the set of basic features that membership site should have. These include:
- Registration and login forms.
- Ability to define different WordPress user roles with different capabilities, for example:
- Job seekers (role A) can add CVs
- Head counters (role B) can perform advanced searches on these CVs.
- Visitors (role C) can only browse CVs, seeing basic information about job seekers.
- Charging fees (optional).
Except for charging fees, WordPress core with its concept of roles and capabilities and registration forms provides all the essential mechanisms for developing a membership site. In addition, because reliable ecommerce WordPress plugins exist, handling fees is not a major concern either.

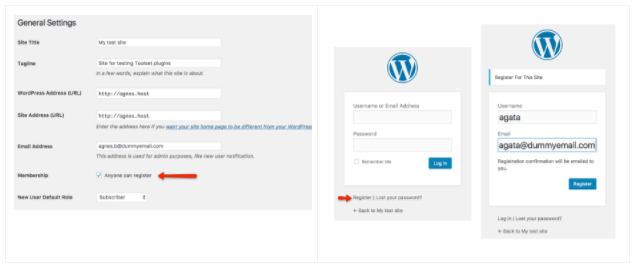 Default WordPress settings. When you enable the Membership option in WordPress General Settings, users can then register on your site.
Default settings in WordPress for user roles. Newly registered users appear on the user’s screen.
At this point, we could say that WordPress can be considered a platform that is sufficient for building a membership site. You can use our managed WordPress hosting for your WordPress platform.
However, as the expression goes: the devil is in the details.
Also Read: MemberPress WordPress Plugin Review
Why Building a Custom Membership Site Is a Challenge?
For some reason, many web developers discard lucrative projects if these involve membership elements. What exactly is the challenge in a building membership site?
We asked some web developers the following question:
Q: “What prevents you from developing your first membership site?”
Let us see how they answered.
Developer A: “I realize that I would need to hide some of my pages from visitors and show the protected content only when a user is logged-in. So I’d need a login form for sure. However, if a login form is required, a signup form would also be needed, right? The WordPress default ones do not count, as they are too ugly. Besides, end-users do not want to know what is behind WordPress. Therefore, the forms would need to match my site’s overall design…and then you would need to hide the pages. Maybe by customizing the WordPress capabilities? That would require some PHP coding I guess…”
Developer B: “I wouldn’t even know how to get started.”
Developer C: “A while ago, I made an attempt to build a kind of membership site. The beta version is still up and running and some people are using it. But it lacks many features. For example, I do not know how to implement the ability to extend a subscription after it expires so that my current users do not have to register again.”
Yes, building a custom membership site is not easy. Many features and user requirements must be addressed.
Let us cover the typical challenges you face when building a membership site.
Challenge #1: How to Get Started?
Many users do not know how to get started, which is understandable. We are not implying that building a membership site is “a piece of cake.” It is not and never has been. However, once you break tasks into smaller pieces, they become easier to manage.
Let us consider a simplified version of your customer’s project.
“Company X wants to turn a profit by providing expert articles. Some articles must be available for free for everyone so both the authors and the company itself can gain credibility as experts. Certain articles will be available for free but only those who are members of the site. Some free articles include hidden parts to be used as teasers to encourage potential members to purchase a full membership. The other will be reserved for users who have already paid.”
Step 1: Define Your Customer’s Needs
First, try to define your customer’s needs in a more systematic way. In other words, turn them into requirements that specify what should be available and for whom. For example:
- The ability for everyone to view free articles.
- The ability for subscribers to view articles that are available only for users who have registered.
- The ability for premium members to view articles reserved only for that group.
- The ability for site managers to hide parts of articles and make those hidden parts available only for paying members.
These would be just some examples. More initially “hidden” requirements may appear when you dive into the topic, that’s normal.
Step 2: Identify User Groups
Note that focusing on who should do what allows you to identify the so-called “actors” that is, users with different roles. Examples might include:
- Visitors: those who visit the site and are not logged in.
- Subscribers: those who have signed up for free.
- Premium members: those who have signed up and paid for the membership.
- Site managers: users who can access your site’s backend but should not be as powerful as your admins.
With the actors identified, you can easily map them into WordPress roles. Roles will be discussed further later in this article.
Including your requirements in a table will also help. Your customer (the business owner) will appreciate it as well, especially if he or she does not speak your technical language.
Step 3: Make a List of What You Need
Before you start looking for specific solutions to implement your customer’s requirements, consider what each of the requirements actually involves.
Ask yourself some specific questions such as the following:
- How will you distinguish articles meant for everyone to read from articles reserved for privileged users? Will you group them by categories? Will you use separate post types for each group?
→ Need: a way to group restricted posts - How would you hide a collection of articles from unprivileged users?
→ Need: a way to restrict access to groups of posts - How do you turn a visitor into a subscriber?
→ Need: a way to include signup forms - What do unprivileged users see on protected pages?
→ Need: a way to include custom templates
You should not consider technical solutions until you write down all these questions.
“A common mistake that web developers make is grabbing any plugin that seems to support their basic features only to discover later that some “little details” exist that they had not considered and that become project “show stoppers.”
Suppose that a site owner must control what is displayed when unprivileged users try to reach protected pages. As such, he or she can provide these users with some teasers or can highlight some prominent features.
If your plugin allows you to display just a simple message such as “You must be logged in to see this page,” your customer might be very disappointed. Your solution works but does not support the business plans of the site owner.
diki.pl (online dictionary), a website where protected content is hidden behind a custom template (the popup on the right) and thus reveals the advantages of signing up as a member.
Step 4: Find Tools to Implement Project Requirements
Once you know what your customer and you as a web developer both require, you can start searching for solutions.
The chances are low that you will find a one-in-all plugin to cover everything. However, combining a few plugins to make your membership site functional is normal. If you have coding skills, you can implement some missing functionalities using custom coding or firm out that work to a programmer.
Hint: Don’t reinvent the wheel. Whether you employ custom PHP coding or use plugins (or both), have your solutions revolved around WordPress mechanisms such as user profiles, roles, and capabilities? This will make your site easier to extend and cross-plugins compatible.
Challenge #2: Defining Custom User Roles
So how will you control access to different resources for each group of your members? The best option is to use roles.
Instead of granting every user access to new resources, you can simply give users specific roles as well as control everything else at the role level.
For example, you may set up Role A to read a few specific posts and Role B to read more posts than Role A, and Role C to add new posts, which means that all users with a given role will be able to do whatever their role allows them to do.
Controlling access through user roles considerably simplifies resource management.
If a user account expires and you still want to retain that user in your system, you do not need to delete all connections to his or her resources. Simply change his or her role to one that has limited privileges.
Account expiration is easy to handle using roles. The screenshot above is from the WooCommerce Subscription plugin.
Note that because WordPress allows you to define custom roles, various WordPress plugins are likely to use the same mechanisms and will automatically detect the custom roles you have defined.
How to Add a Custom Role?
To add a new role, use the add role function. If you are not a programmer (or you are but want to save time), use the Toolset Access plugin.
Adding a custom role using the Toolset Access plugin.
Managing Capabilities
Note that setting up custom roles goes hand in hand with setting up capabilities for that role. Again, through the Toolset Access plugin, you can assign capabilities using checkboxes.
Using the Toolset Access, you control capabilities by checking options.
Hint: Become familiar with WP default roles and capabilities. You will benefit from this in two ways. First, creating a custom role is not necessary if an existing role accomplishes (or nearly accomplishes) what you require. Second, when creating a custom role, you will discover the set of default capabilities makes sense for your case.
Challenge #3: Restricting Access to Different Contents
Controlling Read Access
The most expected protection is restricting read access to your pages and posts (including posts based on a Custom Post Type).
This is because WordPress core does not offer you much in this regard. By default, you can either have an individual post privately or password protect their posts.
WordPress core does not offer many options that allow you to hide some of your posts from public access.
You need more than this. Here are some examples of what you require:
- The ability to restrict read access at a role level for all posts of a given post type.
- The ability to restrict read access at a role level for certain posts/pages (e.g., a group of posts).
- The ability to hide post content but only partially (i.e., to encourage a user to become a member).
Note that new posts will be added to your website. However, establishing a fixed set of protected posts in advance is impossible.
This is why you need an interface that allows the site’s admins or editors to manually set the correct protection levels for new content.
In Toolset Access, this is controlled by Post Groups.
- Create a new group.
- Add specific posts/pages to it.
- Determine the roles that are available to this group.
Restricting read access to a group of posts using the Toolset Access plugin.
Establishing What Unprivileged Users Will See
When limiting read access to pages/posts, controlling what unprivileged users can see is also critical. The following are options to consider:
- Include a “404 page not found”
- Include a custom message
- Include a fully customizable template that might contain a login form and/or a link to a signup form
“Some business owners would love to display something special on protected pages that encourage visitors to sign up or purchase a subscription (e.g., a time-limited offer). The more flexibility business owners have, the better.”
Unprivileged users
Privileged users
In Toolset Access, you can design your own templates and assign different templates to different post groups. Once your template is ready, you can connect it to a group of protected pages.
Setting up a template that will display for users who are not given reading permission.
Challenge #4: Managing User Registration and Accounts
Custom Signup and Login Forms
Registration and login forms are essential for every membership site. WordPress core offers two kinds of forms:
- Login
- Signup
WordPress default login and register forms.
Although some bloggers can use the default forms, these are not acceptable for most business owners.
What business owners expect from login and registration forms:
- The ability to include additional fields.
- The ability to fully customize the forms (to conform with a site’s overall design).
- The flexibility in terms of where the form can be inserted (embedded in a page, in a template, etc.).
Front-end Account Management
Do not forget that your users need a place where they can manage their data such as names, emails, and passwords. Keep in mind that end-users do not need to be familiar with WordPress. Moreover, some would rather not enter the WordPress backend at all.
The Toolset CRED plugin allows you to create front-end forms for adding and managing user profiles. These are fully customizable as well.
Editing user profile via WordPress backend.
Editing user profile on the front-end. Form created using the Toolset CRED plugin.
Challenge #5: Charging Fees for Membership
Launching a membership site is often done to turn a profit. This is why including ecommerce solutions is a necessity for membership sites.
What you might do:
- Find a membership plugin that is already integrated with online payments.
- Add a general purpose ecommerce plugin such as WooCommerce and integrate it with your site.
The Toolset CRED Commerce plugin allows you to connect your front-end forms with WooCommerce products and put the main action on hold until a related order is marked as completed (i.e., payment is successfully ended).
When you use front-end forms to add new posts (e.g., users add CVs), the new post will appear in the draft status and will not be changed to “published” until the related translation is successfully completed.
The signup process for creating user accounts works in a similar manner: a user will not see his or her profile until the order is completed. See the screenshot that follows.
Connecting a user registration form with a WooCommerce product in the Toolset CRED Commerce plugin.
Handling recurring payments (subscriptions that are limited in time and that can be renewed after a specific period) is trickier and requires using a dedicated solution such as the WooCommerce Subscriptions add-on.
Summary
Developing a customized membership site involves understanding some basic WordPress operations such as creating user profiles, roles, and capabilities. Often this means doing some research and planning, especially if this will be your first site of this kind.
When carefully done, membership site gives you more flexibility on different levels. Your site will be easy to extend and easier to manage. In addition, you will be well-equipped with tools and strategies that you can use with different projects.
Are you planning on doing any similar projects? Toolset can help. Remember that you can try it for 30 days. If you are not completely happy, you will receive a full refund with no questions asked.
Note: This article was published in collaboration with Agnes Bury from WPML.
Danish Naseer
Danish Naseer is a WordPress Community Manager at Cloudways. He is passionate about designing, developing, and engaging with people to help them. He also actively participates in the community to share his knowledge. Besides that, he loves to watch documentaries, traveling and spending time with family. You can contact him at [email protected]


