The cart page is a fundamental element of your store, where customers’ order information is displayed. By default, the cart does not appear in the WooCommerce menu, so it cannot satisfy most of your needs. Sometimes, it may be necessary to customize it to improve customer experience and conversion rate. But how?
In this article, I will show how you can display WooCommerce cart content and cart count in the main menu so that when a customer adds new products, they are updated automatically through AJAX. The customer sees the WooCommerce cart content as it is updated during the checkout process.
Check WooCommerce Activation
The following code performs several operations to display WooCommerce cart content and cart total to customers. The code will first check whether WooCommerce is active or not to avoid any errors.
<?php global $woocommerce; ?>
 <a class="your-class-name" href="<?php echo $woocommerce->cart->get_cart_url(); ?>"
title="<?php _e('Cart View', 'woothemes'); ?>">
<?php echo sprintf(_n('%d item', '%d items', $woocommerce->cart->cart_contents_count, 'woothemes'),
 $woocommerce->cart->cart_contents_count);?>  -
<?php echo $woocommerce->cart->get_cart_total(); ?>
</a>
The best thing about the above code is that you can place it anywhere in the theme’s files, preferably at the location you want to display it.
From launching to customizing your WooCommerce stores, Cloudways is at your service.
Whether you’re a beginner or an expert, Cloudways Platform is based on UI, where you can create and customize your online store in a few seconds.
Add Custom Code in header.php
In the next step, I will add the following code to the header.php file, just below the navigation menu.
<html <?php language_attributes(); ?> class="no-js no-svg">
<head>
    <meta charset="<?php bloginfo('charset'); ?>">
    <meta name="viewport" content="width=device-width, initial-scale=1">
    <link rel="profile" href="http://gmpg.org/xfn/11">
    <?php wp_head(); ?>
</head>
<body <?php body_class(); ?>>
<div id="page" class="site">
    <a class="skip-link screen-reader-text" href="#content"><?php _e('Skip to content', 'twentyseventeen'); ?></a>
    <header id="masthead" class="site-header" role="banner">
        <?php get_template_part('template-parts/header/header', 'image'); ?>
        <?php if (has_nav_menu('top')) : ?>
        <div class="navigation-top">
            <div class="wrap">
                <?php get_template_part('template-parts/navigation/navigation', 'top'); ?>
                <!--Custom cart start-->
                <?php global $woocommerce; ?>
                <a class="your-class-name" href="<?php echo $woocommerce->cart->get_cart_url(); ?>"
                   title="<?php _e('Cart View', 'woothemes'); ?>">
                    <?php echo sprintf(_n('%d item', '%d items', $woocommerce->cart->cart_contents_count, 'woothemes'),
                    $woocommerce->cart->cart_contents_count);?>  -
                    <?php echo $woocommerce->cart->get_cart_total(); ?>
                </a>
                <!--Custom cart end-->
            </div>
            <!-- .wrap -->
        </div><!-- .navigation-top -->
        <?php endif; ?>
    </header>
    <!-- #masthead -->
    <?php
    // If a regular post or page, and not the front page, show the featured image.
    if (has_post_thumbnail() && (is_single() || (is_page() && !twentyseventeen_is_frontpage()))) :
        echo '<div class="single-featured-image-header">';
        the_post_thumbnail('twentyseventeen-featured-image');
        echo '</div><!-- .single-featured-image-header -->';
    endif;
    ?>
    <div class="site-content-contain">
        <div id="content" class="site-content">
Preview Cart Count and Total
After adding the code, update the file and refresh the front-end of your WooCommerce store. You will see the cart count and total in the header.

– Preview Cart Details
Add New Products to the Cart
To try out this cart, I will now add a few products to the cart to see what happens to the cart. Once I add them, the cart in the header looks like this:
– New Products in Cart
Validate Custom Code for Cart
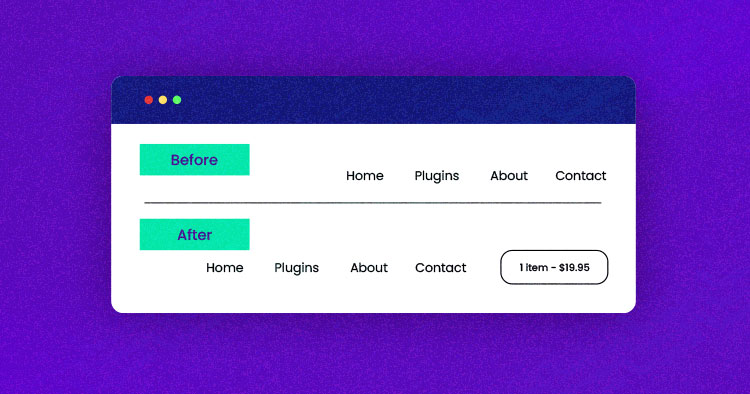
At the moment, there is still a critical issue with the code. The cart viewer is not updated when I add products to the cart using AJAX. In the following two images, you can see a similar product count before and after the cart’s position when I add products to the cart using AJAX.
– Position Before the Code
– Position After the Code
To resolve this, add the following lines of code at the end of the theme’s functions.php file.
add_filter('add_to_cart_custom_fragments', 'woocommerce_header_add_to_cart_custom_fragment');
function woocommerce_header_add_to_cart_custom_fragment( $cart_fragments ) {
                global $woocommerce;
                ob_start();
                ?>
                <a class="cart-contents" href="<?php echo $woocommerce->cart->get_cart_url(); ?>" title="<?php _e('View   cart', 'woothemes'); ?>"><?php echo sprintf(_n('%d item', '%d items', $woocommerce->cart->cart_contents_count, 'woothemes'), $woocommerce->cart->cart_contents_count);?> - <?php echo $woocommerce->cart->get_cart_total(); ?></a>
                <?php
                $cart_fragments['a.cart-contents'] = ob_get_clean();
                return $cart_fragments;
}
Save the file and add the products. Now you will see the change in the cart viewer when you add the products via AJAX.
– Change in Cart View
Summary
In this article, I briefly explained how to display WooCommerce cart content (number of items in the cart) and the cart total without using any plugins. You can do it with the help of the code I provided above. If you find any issues in the code or would like to contribute to the article, please leave a comment.
Q. How do I add a WooCommerce cart to the header?
To add a WooCommerce cart to the header, you can use the following methods:
Method 1: Navigate to Appearance > Customize and look for the header settings or WooCommerce options to enable the cart icon.
Method 2: Install a plugin like “WooCommerce Menu Cart” to automatically display the cart icon in the header, with options for customization.
Method 3: If you’re comfortable with code, you can add the WooCommerce cart code to your theme’s header file (header.php) using the following PHP function
<?php if ( function_exists( 'woocommerce_widget_cart' ) ) { woocommerce_widget_cart(); } ?>
Q. How do I add a cart icon in the header?
Method 1: Install a plugin like “WooCommerce Menu Cart” to add a customizable cart icon to your header.
Method 2: you can add a cart icon manually by adding the following HTML and PHP code in the header.php file
<div class="cart-icon">
    <?php echo WC()->cart->get_cart_url(); ?>
</div>
Q. How do I show the total cart amount in WooCommerce?
A. You can add custom PHP code to your theme’s functions.php file to display the cart total anywhere on your site.
echo 'Cart Total: ' . WC()->cart->get_cart_total();
Moreover, Plugins like WooCommerce Menu Cart or WooCommerce Mini Cart can automatically display the total cart amount in the header, sidebar, or as a floating cart, without needing custom coding.
Q. What WooCommerce plugins can I use to show cart totals and content?
A. You can use many WooCommerce plugins to show cart totals and content, such as WooCommerce Menu Cart to display the cart icon and total in the header, WooCommerce Mini Cart for a pop-up or dropdown view, and WooCommerce Customizer for easy customization of cart displays.
Owais Khan
Owais works as a Marketing Manager at Cloudways (managed hosting platform) where he focuses on growth, demand generation, and strategic partnerships. With more than a decade of experience in digital marketing and B2B, Owais prefers to build systems that help teams achieve their full potential.