EXPLORE CLOUDWAYS
Experience lightning-fast loading times and seamless platform
View Demo >PRODUCTS
CLOUD PROVIDERS
SUPPORTED APPS
WHO WE SERVE
PARTNERSHIP PROGRAMS
Lifetime deal: 75% OFF
Advanced Support
POWERFUL FEATURES
DISCOVER
WHY CLOUDWAYS
 Read Case Study >
 Jesse Tutt
Founder & CEO

A Cloudways tutorial on migrating an existing WordPress or WooCommerce site with the free Cloudways WordPress Migrator plugin, no manual file juggling required.
✨ What you’ll learn
✦ How to launch a destination WordPress application on Cloudways before migrating.
✦ How to install and run the free Cloudways WordPress Migrator plugin on your current site.
✦ Where to find your Destination URL, SFTP host, database name, and master credentials.
✦ How to test the migrated site, and how to request the first free support-assisted migration.
Hello everyone, welcome to Cloudways, your go-to platform for hassle-free web hosting. We are all about making web hosting easier so you can grow your business faster. I’m Tayyaba Fatima from Cloudways, and today I’ll guide you through some common workflows for migrating your website to Cloudways.
Let’s start. If you already have a WordPress website hosted somewhere else, it’s super easy to move your website to Cloudways. In this tutorial, I’ll show you how to migrate your WordPress website to Cloudways using a free WordPress Migrator plugin. You can also migrate WooCommerce sites to Cloudways using the same plugin.
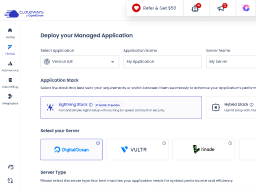
To migrate your website to Cloudways you’ll need to have the admin access for your current WordPress website. You’ll also need a Cloudways account. If you haven’t created one yet, you can watch our short video about the signup process. Just click the link in the top right corner. Now that you have your account set up, you need to launch a WordPress application on Cloudways. You will migrate your website to this application. To do this, click on the View All Servers link, then you click on the Add Server button, select the WordPress application. Then you need to name the application and the server. After this, you choose a cloud provider, select the server size, and select the location. Then you click the Launch Now button.
Next, you need to go to your current hosting provider where your WordPress website is hosted, and install the Cloudways WordPress Migrator plugin. Here’s how you install the plugin. First, you go to the WordPress admin panel and log in with your credentials. Select Plugins, click Add New. Next, search for the Cloudways WordPress Migrator plugin, click Install Now. Once the plugin is installed, click Activate.
To start the migration process you will need to do these three steps. Enter your email address, agree to the terms and conditions and privacy policy, and click Migrate. You will also need to enter some information about your website. This includes your Destination Application URL, which is the URL of your WordPress application that you launched on Cloudways earlier, your SFTP host/server address, which is your Cloudways server’s IP address, and your database name.
To find your WordPress application information, follow these steps. From the Cloudways dashboard, click on the View All Servers link. Then choose the server where your application is deployed. Next, click www. Then choose your application. Here, you will find your Destination Application URL, SFTP Host/Server Address, and Database Name.
Under “Where do you want to migrate your site?” select Cloudways Flexible. The next step is to enter your SFTP Username. Your SFTP username is your master username. Enter your SFTP Password. This is your master user’s password. To find your SFTP username and password, go to the Servers, then choose and click the server where your application is deployed. Under the Master Credentials tab, you can see the SFTP username and password.
Under “HTTP Authentication enabled?” select No, as we have not set up a password to visit the Cloudways-hosted application. If your Cloudways-hosted site is restricted and password-protected, select Yes and enter the username and password. Under “Any root directories you want to migrate?” select Yes if you also want to migrate your custom non-WordPress directories present in the public_html directory. Otherwise select No if you don’t want to migrate your custom directories. Under “Is this site protected?” select No if your current WordPress website on another host is not restricted and is not password-protected. If it is password-protected, then select Yes and enter the username and password. Finally, click Migrate.
That’s it. Your website is now being migrated. The migration time is based on the size of the data being migrated. Once the migration is complete, you can test your site by clicking “Go to Cloudways” or by simply visiting your Cloudways-hosted application. Please note that your Cloudways-hosted application is going to have new wp-admin credentials available on the Cloudways platform.
Additionally, Cloudways provides support-assisted migrations, ensuring a seamless transfer of your websites to our platform. As a new customer you can enjoy the benefits of our first free migration service. The process is straightforward, simply start a support chat from the Cloudways platform and request the free migration. Once the initial migration is completed, any future migrations will be subject to specific charges based on the type of application being transferred. We make it easy and convenient for you to migrate your websites and manage them.
So that’s it. I hope you now understand how to use the Cloudways WordPress Migrator plugin to easily migrate your WordPress website to the Cloudways platform. If you have any questions, feel free to comment down below, and subscribe to our channel to get more helpful Cloudways tutorials. Thanks for watching. See you in the next video.
Answer a few questions, and we'll present you with a personalized tour of the Cloudways platform based on your answers.