


There is a WooCommerce default quantity input box in the product pages. However, there is not much you could do with this box.
A common use case is “idiot proofing” this box to make sure that the users could not enter their own values in the box. Instead, they could only select from the presented options. Note that this box is a text field.
This is how the default WooCommerce product page quantity box looks like:

By default, WooCommerce cart page shows the quantity box as a range:
I will now demonstrate how to replace quantity text fields with a dropdown box. This will be done through the following code (located in functions.php of the theme folder):
function woocommerce_quantity_input($data = null) {
global $product;
if (!$data) {
$defaults = array(
'input_name'   => 'quantity',
'input_value'   => '1',
'max_value'     => apply_filters( 'woocommerce_quantity_input_max', '', $product ),
'min_value'     => apply_filters( 'woocommerce_quantity_input_min', '', $product ),
'step'         => apply_filters( 'woocommerce_quantity_input_step', '1', $product ),
'style'         => apply_filters( 'woocommerce_quantity_style', 'float:left;', $product )
);
} else {
$defaults = array(

'input_name'   => $data['input_name'],

'input_value'   => $data['input_value'],
'step'         => apply_filters( 'cw_woocommerce_quantity_input_step', '1', $product ),

'max_value'     => apply_filters( 'cw_woocommerce_quantity_input_max', '', $product ),

'min_value'     => apply_filters( 'cw_woocommerce_quantity_input_min', '', $product ),

'style'         => apply_filters( 'cw_woocommerce_quantity_style', 'float:left;', $product )

);

}


if ( ! empty( $defaults['min_value'] ) )

$min = $defaults['min_value'];

else $min = 1;


if ( ! empty( $defaults['max_value'] ) )

$max = $defaults['max_value'];

else $max = 15;


if ( ! empty( $defaults['step'] ) )

$step = $defaults['step'];

else $step = 1;


$options = '';


for ( $count = $min; $count <= $max; $count = $count+$step ) {

$selected = $count === $defaults['input_value'] ? ' selected' : '';

$options .= '<option value="' . $count . '"'.$selected.'>' . $count . '</option>';

}


echo '<div class="cw_quantity_select" style="' . $defaults['style'] . '"><select name="' . esc_attr( $defaults['input_name'] ) . '" title="' . _x( 'Qty', 'Product Description', 'woocommerce' ) . '" class="cw_qty">' . $options . '</select></div>';


}
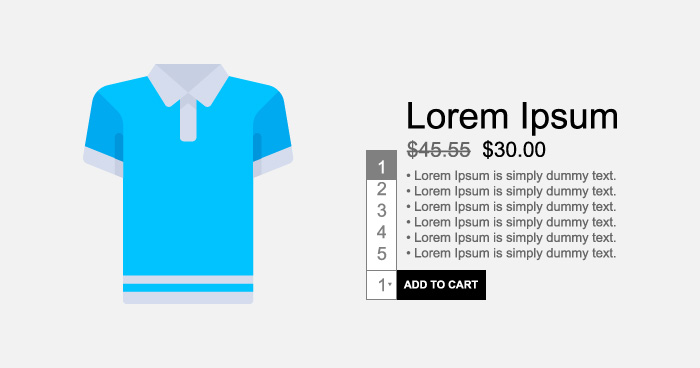
Once the code has been added, the WooCommerce default quantity box will change to the dropbox:
The cart page will look like:
WooCommerce Stores Need a Reliable Hosting Stack
See how Cloudways helped Silicon Dales to manage their hosting stack
Final Thoughts
In this tutorial, I discussed how to display quantity select box as a dropdown, instead of the WooCommerce default quantity input option. If you need help with the code or would like to suggest improvements, do leave a comment below.
Owais Khan
Owais works as a Marketing Manager at Cloudways (managed hosting platform) where he focuses on growth, demand generation, and strategic partnerships. With more than a decade of experience in digital marketing and B2B, Owais prefers to build systems that help teams achieve their full potential.

