WordPress website users are always in search of something out of the box and by aiming to achieve that 90+ Google PageSpeed Insights score benchmark is quite possible. Generally, there are several techniques to speed up WordPress websites but among all, browser caching is most commonly found issue during website speed optimization analysis.
To monitor and test your website’s performance, you can use a number of online tools such as Google PageSpeed Insights, GTMetrix, and Pingdom. They provide accurate results and help you understand where your website needs improvements. While testing the site’s performance, you may have received warning notification of “Leverage Browser Caching”.
Today, we are going to discuss how you can resolve this issue. So, let’s not waste time and delve in.
- What Is a Browser Cache and How Does It Work?
- What Is Leverage Browser Caching?
- Fix “Leverage Browser Caching” Warning
- Cache-Controls
- Leverage Browser Caching for Google Analytics
- Still Seeing the Leverage Browser Cache Warning?
- I’m a Cloudways Customer, What’s in It for Me?
- Leverage Browser Caching with W3 Total Cache
- Frequently Asked Questions
What Is a Browser Cache and How Does It Work?
Whenever a person visits your website, the browser sends a request to load assets such as HTML, Scripts, Images, CSS, etc. from the server. The server then responds to the browser’s request. Depending on the size of the asset requested and server process time, the response may take a bit of time to respond. It ultimately results in increased load on the server and slows down the website on the user’s end.
In this situation, browser cache works best. It stores static content on a user’s browser, the first time a visitor visits a website. If your website is not properly configured with browser cache and you are testing your website speed using any of the above-mentioned performance testing tools, the tool will definitely show a warning message to leverage browser caching.
According to Google, the server response should include below two tags in the header:
Cache-Control defines how, and for how long the individual response can be cached by the browser and other intermediate caches.
ETag provides a revalidation token that is automatically sent by the browser to check if the resource has changed since the last time it was requested.
Looking for better performance and security?
Migrate your WordPress website to Cloudways at zero cost.
What Is Leverage Browser Caching?
In simple words, leverage browser caching helps in reducing HTTP requests to load pages faster and also improves server response time.
Let’s take a look at a live example. I tested my website using Think with Google and here is the result.

Let’s test it from Google PageSpeed Insights tool.
Okay so, you can see my website’s overall performance is pretty good. But, there is room to improve it. It is showing that my internal URLs can be cached.
Fix “Leverage Browser Caching” Warning
To fix the “Leverage Browser Caching” warning, you will have to perform the following two steps.
- Change request headers to use cache
- Optimize caching policy
1. Change Request Headers to Use Cache
One way to improve your website speed and response is to change request headers to use the cache. We are going to add a few lines of code to our WordPress .htaccess file.
Achieve 90+ PageSpeed Insights Score with Browser Caching [Free eBook]
Discover how to leverage browser caching and more to boost your website’s load speed. Learn this and more in our free ebook.
Thank You
Your Ebook Is on It’s Way to Your Inbox.
Note: .htaccess is the control room of a website. If not configured properly, it may break down the complete site while you are at it! Learn how to protect your WordPress with .htaccess file.
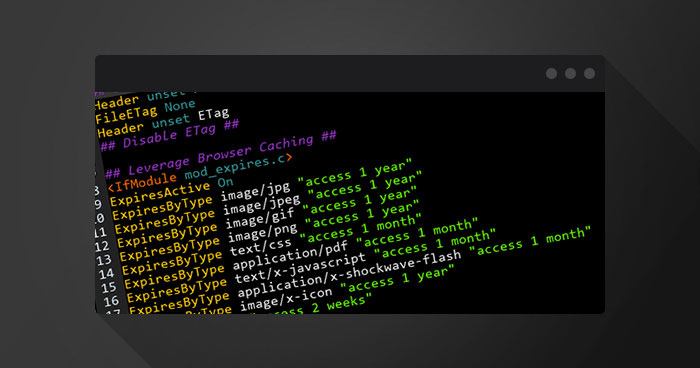
To leverage browser caching in WordPress, access the main directory of your WordPress installation, search for the .htaccess file and open it with any code editor. Simply, paste the below-stated lines at the top of the WordPress .htaccess file.
## EXPIRES CACHING ##

<IfModule mod_expires.c>

ExpiresActive On
ExpiresByType image/jpg "access 1 year"
ExpiresByType image/jpeg "access 1 year"
ExpiresByType image/gif "access 1 year"
ExpiresByType image/png "access 1 year"
ExpiresByType text/css "access 1 month"
ExpiresByType text/html "access 1 month"
ExpiresByType application/pdf "access 1 month"
ExpiresByType text/x-javascript "access 1 month"
ExpiresByType application/x-shockwave-flash "access 1 month"
ExpiresByType image/x-icon "access 1 year"
ExpiresDefault "access 1 month"

</IfModule>

## EXPIRES CACHING ##
2. Optimize Caching Policy
The second step to speed up response time on your website is to Optimize Caching Policy. The above code describes file types and their expiries. It’s totally up to you, how much time you want to store specific static content in the user’s browser cache. If your static content like images is long-term. I would suggest you set them for a year. However, the content you suspect that can be changed in the near future, it is suggested that you set the expiry date for at least a month.
Cache-Controls
If the above method fails to work on your server, we have another alternative around that can help you out with cache-controls to set caching expiry. All you have to do is copy and paste the following lines at the top of your .htaccess file.
# 1 Month for most static assets

<filesMatch ".(css|jpg|jpeg|png|gif|js|ico)$">
Header set Cache-Control "max-age=2592000, public"

</filesMatch>
Same as the previous step, the above code describes the expiry and caching policy of different file types.
Note: 2592000 seconds = 30 days. This is the minimum value that can eliminate the warning. If the expiry is less than this, you might still see the leverage browser warning, suggesting to increase the expiry.
After setting up the .htaccess file correctly, we are now going to test it. So, Let’s test!
And the “leverage browser caching” warning has been fixed.
WordPress Leverage Browser Caching for Google Analytics
If you are using any WordPress plugin for Google Analytics, you may still get leverage browser caching warning, doesn’t matter you set up everything correctly.
It is because Google Analytics set the default expiry time for only two hours to make sure you get updates as fast as possible.
There are two ways to fix leverage browser cache warning for Google Analytics.
- Local: You can create a local copy of analytics.js and/or ga.js (whatever file you are dealing with leverage browser cache). Please note that Google does not recommend this method.
- Plugin: Use Complete Analytics Optimization Suite (CAOS) WordPress plugin that hosts your Google Analytics file locally and use wp_cron() to keep it updated.
Still Seeing the Leverage Browser Cache Warning?
After setting everything correctly, you might still be seeing Google suggesting to leverage the browser cache, like the image below.
As you can see, the above files are third-party integrations. These are not present on our server. There is nothing we can do with them except to delete them. All third party integrations can cause this warning in speed testing tools.
I’m a Cloudways Customer, What’s in It for Me?
If you are a Cloudways optimized WordPress hosting customer, then you should put aside your worries about WordPress leverage browser cache warning popping up in online speed testing tools. Because Cloudways handles this issue by itself. You can change the expiry time by simply navigating to Server → Settings & Packages → Advanced, scroll down a bit and look for NGINX – Static Cache Expiry. The default value is 43200 min, that is equivalent to 30 days.
Leverage Browser Caching with W3 Total Cache
The above-stated method is the manual way to remove leverage browser cache warning. If you are using a caching plugin such as W3 Total Cache, you need to enable browser cache by navigating to Performance → General Settings.
Then navigate to Browser Cache and mark below five check boxes.
Scroll down a bit to set the expiry time for CSS & JSS files. The default value is 31536000 that is equivalent to 365 days. You can change this to your required time frame.
Scroll down a bit more to set an expiry time for HTML & XML.
To change default values for Media & Other Files, scroll down a bit and set expiry. The default value is 31536000, that is equivalent to 365 days.
Final Thoughts
Leverage Browser Caching helps in improving the web performance testing score. Remember, these settings are only for building basic guidelines and understanding among WordPress users. Aside from this, there are a number of techniques that can help individuals to achieve a faster website within no time, in which the most important is choosing fastest WordPress hosting.
If you have any query, feel free to ask in the comments section below. I would love to answer.
What are cache files?
Cache files are the ones that are downloaded for temporary usage, just like you are visiting a website for a particular period of time. The next time you visit the same website, it will load faster because of the already downloaded cached files.
Is cache data important?
Yes, cache data is important for speed. Almost every website uses it. However, if you are in the development stage of a website, the cache might become problematic as it will be showing the already stored version.
What is in the cache of a browser?
Browser cache is temporary storage for files downloaded by the browser to display a website. It includes HTML, Cascading Style Sheets (CSS), JavaScript, images and any other multimedia content that can be cached.
Why do I need to clear browser cache?
When there is an update to the website you visited, you may see some old content, it is because you didn’t clear your browser cache.
How do I clear browser cache?
There are a number of WordPress cache plugins that allows you to clear the browser cache. If not, you can manually clear the cache by following the guides of your respective browser.
Is it fine to delete cached data?
It depends! The cache sometimes gets confused and you have to clear the cache. Whenever you see partially loaded elements and/or badly formatted pages, a picture in the wrong place, etc, the very first thing that comes to everyone’s mind is to clear the cache. By clearing the cache, you will lose any stored data and the browser will fetch the fresh content.
Mustaasam Saleem
Mustaasam is the WordPress Community Manager at Cloudways. Where he actively works and loves sharing his knowledge with the WordPress Community. When he is not working, you can find him playing squash with his friends, or defending in Football, and listening to music.